
5 Essential Sewing Machines You Need to Know as a Fashion Designer
Truth be told, a singular blog post would not be enough to address all the machines used in apparel production. Just like anything, if there is a specific need, something will be made to help solve the problem. Machines can run the gamut from cutting equipment, to sewing, to packaging and labeling. You name it, there’s a machine for that!
I once worked with an overseas factory that did a lot of traditional button down blouses. But as the business evolved, they began to get requests to do women's blazers. They dipped their toes into this pool and it seemed to be profitable enough. They started taking on more and more orders for blazers. The problem was the shoulder pads though. These still required tacking in by hand. Now if you know anything about factory production, hand sewing is definitely something that most factories go out of their way to avoid. Instead, the owner of the factory invested in a machine that specifically did just this one task.
This level of specialization is not the norm. Generally factories have the basic machines in place and then build out based on their specific product needs. Afterall, not all factories make all the things. As discussed in a previous blog post, factories have their own specializations.
When you work with a factory, knowing all the types of machines is definitely not a prerequisite. You don’t have to quiz them and they won’t quiz you. However, when you are developing your product it’s important to understand the basic machinery needed to make your product so you understand what is needed and then you can discuss your needs with your factory.
To make sure you are prepared for your own production, I’m going to give you an overview of the 5 essential machines you need to know.
One caveat to these machines is that you have to understand that the garment industry is weird. We have a lot of different terms for the same thing. I couldn’t even tell you why this is. I just find that the name of things in general, depends on who I’m working with and what they are calling it. The same proves true for the 5 essential machines so I’m going to give you a few other name aliases for each in case someone doesn’t know what you are talking about.
Lockstitch
(Alias, straight stitch, plain needle, or general purpose)
The lockstitch machine is the most commonly used and identified machine. This does the same type of stitch that your standard tabletop home sewing machine does. Essentially a lockstitch machine has an upper thread and a lower thread that are looped together to form straight stitches that look the same on both sides of the fabric.
A lockstitch machine is used mostly for woven fabrications as it doesn’t always allow for a lot of stretch. (I use my own industrial lockstitch for sewing a lot of knits. However, what I make is generally for myself and I reinforce it with an overlock. Essentially it can be done, but I wouldn’t recommend it for mass production).
Typical seam allowance width for a lockstitch machine is ½” - ⅜” wide.
2. Overlock
(Alias merrow or serger)
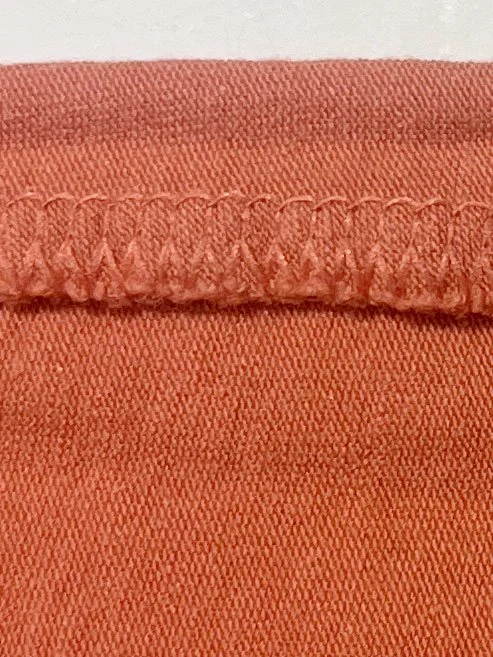
The second most common industrial machine is an overlock machine. An overlock machine creates a cover over the edge of fabric with thread, overcast as loops, to help prevent fraying and give a more finished look. An overlock machine can be described by 3-5 threads. For example, my own studio set up is a 3 thread overlock- a lower looper, an upper looper and a single stitch to secure them. The additional thread options speak to the number of additional threads used to help reinforce the stitch. Most knit garments are sewn together using a 4 thread overlock machine.
To help make a neat edge, most overlock machines have a knife that trims away excess fabric to ensure a consistent and smooth edge.
Typical seam allowance for an overlock machine is ¼”.
3. Coverstitch
(Alias coverhem)
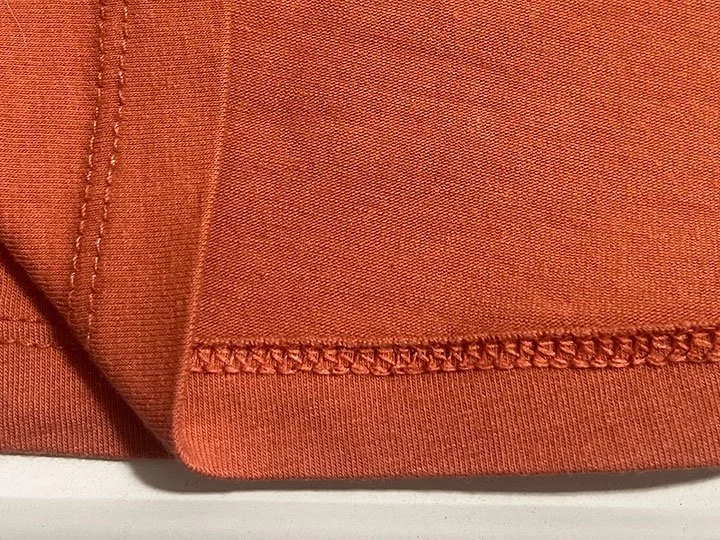
A coverstitch machine is generally used for the hemming of stretch fabrics, such as t-shirts and athletic fabrics. It can sometimes be utilized in waistband sewing or the joining of fabric to elastic in sportswear. It is recognizable by the two parallel rows of stitching on the face of the fabric, but the underside consists of loops that allow for stretch and movement without thread breaking. If you are producing any kind of knitwear you will definitely want to use a coverstitch for your bottom hem as opposed to a lockstitch that can easily snap and break if stretched too far.
Some home machines have needles that emulate the look of a coverstitch, but the lower loops are essentially a zig zag stitch and not the best option for mass production since they can still easily break.
Coverstitches can come in different widths between the needles. Some can go as wide as ¼”, others as narrow as ⅛”. It all depends upon the look you want.
Typical hem widths for coverstitch operations are ½”-1”, but it can vary by design intent.
4. Flatlock
(Alias flat seamer, coverstitch overlock, flatbed/flat arm machine)
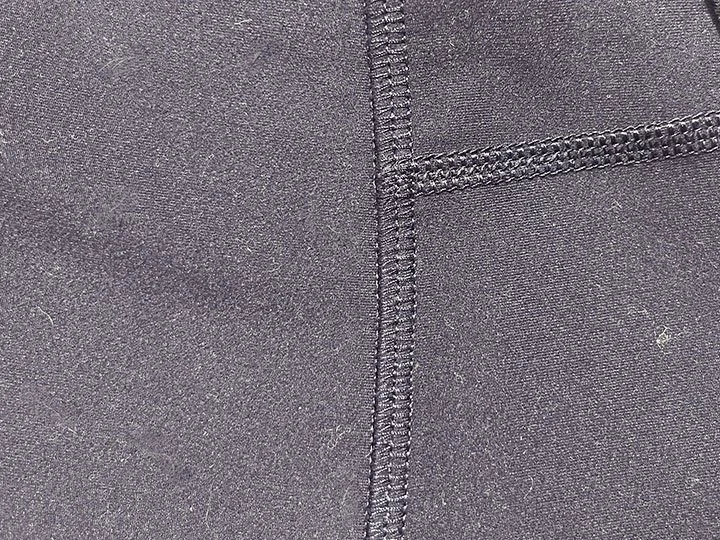
The most commonly used machine for any type of performance apparel is a flatlock machine. A flatlock machine allows two pieces of fabric to be abutted together and then joined with an overlapping thread. Loops are on both sides of the fabric, secured with straight stitches on both sides. This yields a smooth non-bulky appearance.
Flatlock machines are expensive and notoriously difficult to use and maintain so not all manufacturers have this type of machine. I suggest checking with your factory because patterns need to be specifically engineered for the minimal seam allowance needed for the flatlock machine.
Typical seam allowance width for flatlock machines are 0-⅛” wide.
5. Chainstitch
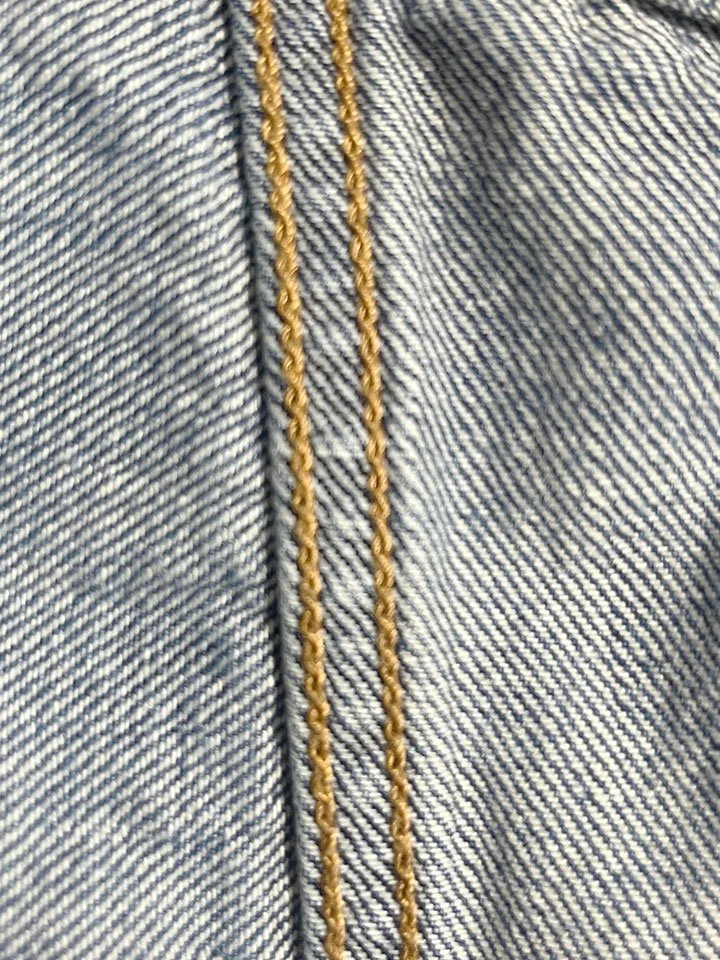
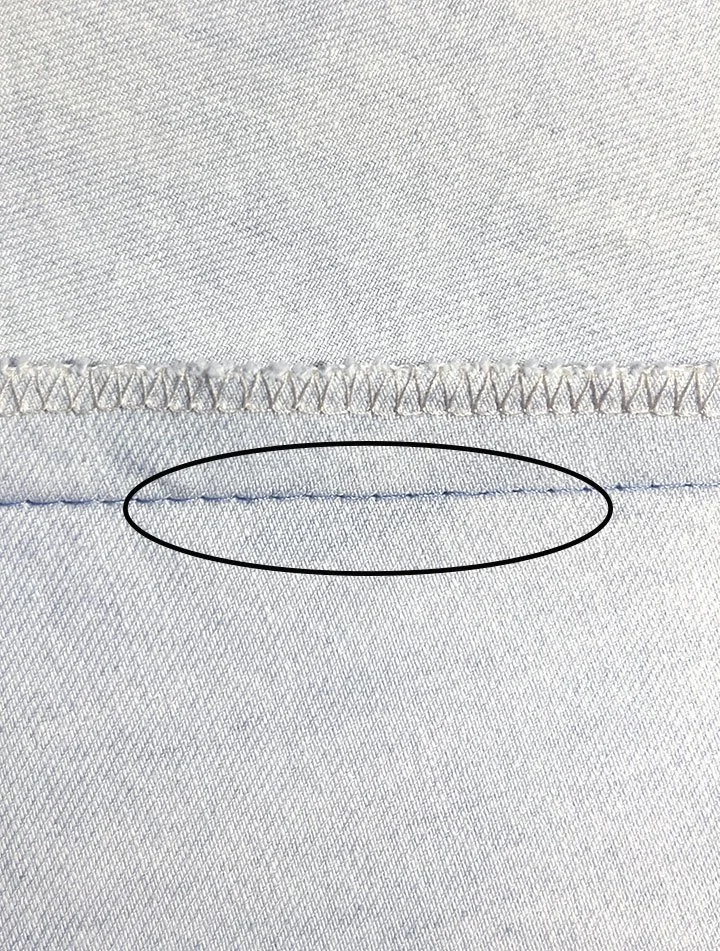
A chainstitch machine produces a row of stitches using a single thread that is looped back upon itself, creating a rope-like appearance on the underside of the fabric. Now this may sound like something that you would never need or have encountered throughout your own home sewing journey. That is because a chainstitch generally enters the picture when extra reinforcement is needed because your lockstitch will not stand up to heavy duty demands. Typical usage of chainstitching can be found on the inseams and rises of your jeans. It’s also a very industrial type of stitch utilized frequently with upholstery and signage- basically non-woven fabrics that have to withstand a lot.
Overlock machines sometimes have a chainstitch option for extra security. I once worked at a place that referred to an overlock and chainstitch combo as a “slippage stitch”, essentially keeping fabrics together that are likely to tear or stretch with wear.
Typical seam allowance width for a chainstitch machine can vary based on needs.
You only need to know these machines, not have them
I just want to summarize that you don’t need to necessarily incorporate these machines into your own studio–unless
a) you have a legit need for them
b) really, really like collecting machines
c) have some extra money laying around.
If you are making your own samples, it’s totally fine to work with what you have and then include notations on your reference sample for your manufacturer.
Just for POV- in my own studio I have a lockstitch and an overlock. That’s it. I did have a coverstitch but it never worked properly and finding a technician for it outside of a metropolitan area is tricky so I ended up selling it. I do covet a flatlock machine and a keyhole buttonhole machine though!