
Pattern School: How to Ensure Your Sleeve and Armhole Curves Will Match
Ensuring that all your seams match properly is key to producing garments or home sewing patterns. Accuracy is a must to get consistent results. I’m pretty rigorous on how seams match up when I am making patterns digitally. Generally, my allowable difference in matching is .03”, and I’m always striving for 100% accuracy. This amount is barely visible to the naked eye, but it allows me to verify and confidently say that everything will match as it should.
Now I may be considered an oddball pattern maker because I don’t use drafting methods (rock of eye and final measurements only), I work with my pieces orientated vertically, and for today's installment I tell you that seam allowance is always an afterthought. I work primarily based on the sewing line.
What I mean by sewing lines are the areas that will be sewn on if proper seam allowances are made. For instance, If you have a 2” wide hem, and I’m supposed to achieve 25” finished length, I don’t count that hem. I have a line marked for where the edge of the garment will be so it is easy to verify. This could be hems, necklines and edges where two seams meet.

Even before I started working digitally I’ve always worked this way and put the seam allowance on once the piece is correct. I guess I just always like to work by seeing what the finished output will be instead of having to visually subtract seam allowance.
When a pattern is used for its main purpose as a template, generally this final output doesn’t have the sew lines visible. For home sewing patterns, this can just create confusion with too many lines. For mass production, the same applies, but also there are notes on the cutters must and tech packs as to what the seam allowance should be so it’s not necessary on the final pattern.
When I first started working in the garment industry, there were still many patternmakers who worked on oak tag patterns. This meant that they would need to work with the seam allowance on the pattern and make adjustments from there because adding seam allowance later would be a huge waste of paper. I think this is where a lot of misunderstanding comes into play with a lot of self taught pattern makers. Without working with a visible sew line, making the edges match perfectly should just be enough. Right?
This workflow is great for straight lines. You can easily check. However, when it comes to curves, we are entering in a slightly different territory. Let’s start with the most obvious of curves. The sleeve cap. If you are working on the sew line of this convex curve, you will see that the sew line is 17.94”.

But when you apply a seam allowance to that curve, the new edge will automatically become longer. Now the sleeve cap is 18.07”. Now this may seem like a small amount, but even small amounts can create problems. The more extreme the curve, the greater the difference tends to be.

The problem that arises from this is that if your armhole is 17.94” and your outer sleeve cap is 18.07” you may think you need to reduce your cap length, so you start whittling away, and changing shapes. Once that outer cut edge now meets the required length, when you go to sew your convex sleeve cap to your concave armhole, it will not match the best and the cap will essentially be made to stretch to fit the armhole curve because where the sewing lines of the armhole and sleeve cap meet, there will be a discrepancy.
…perhaps this is where the idea of sleeve cap ease comes into play, which I am not a fan of either….
Lets look at the second most common curve, the armhole itself. It’s important to keep in mind that if working on the cut line, one must remember to exclude the seam allowance at the shoulder and side seam. In the example below you can see we are working with almost a 1” discrepancy (.88”). This is going to create a huge difference in outcomes if you start modifying the sleeve cap or the armhole so they match up better.

The problem I have with checking curves based on the cut edges is that it leaves a lot of vagueness. If I have to meet measurement requirements in a tech pack, then I must have the sew line because I’m not going to measure each piece and then subtract the seam allowance(s) to get the finished measurement. That's just absurd. But if I am making this pattern for you, and you are gauging pattern accuracy based on cut lines we will get totally different results when matching of the sleeve caps to armholes and the notches that correspond.
The same curve rule applies to princess seams and any other curved seams. As you can see by this picture, the princess seams match perfectly along the sewn edge. But when the seam allowance is added, the center front panel gets noticeably smaller, whereas the side front seam gets bigger. In the example below, there is almost a 3/4” discrepancy (.79”).
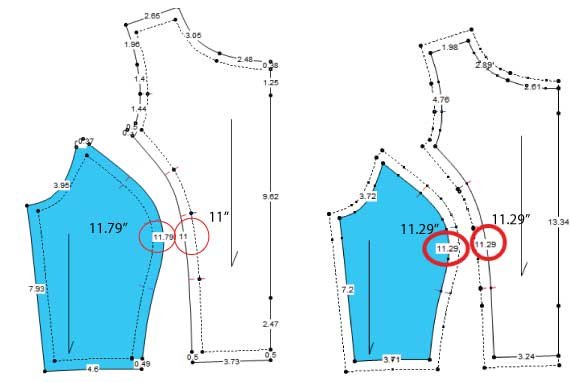
When you sew a concave curve to a convex curve there will always be differences so it’s best to match the common shared point of where it will be sewn.
Checking curves based on the sewing line allows for 100% verifiable accuracy, knowing that the areas that are intended to match up will do so. Have I convinced you?