
Pattern School: Why You Can’t Make a Sleeveless Garment Sleeved
Who doesn’t like a bonus, mix and match pattern! You know, something where you can have a tank top and also use the same bodice for a long sleeve top. I mean just think of the possibilities and time saved not having to either make a brand new pattern. Two styles in one!
But wait my friends, let me slow you down a minute. Yup, it’s me the party pooper here to fill you in on the technical “how-comes”. But hear me out.
This is one that comes up pretty often, mostly with sewing patterns, but I’ve also had ready to wear designers try to get more mileage out of their patterns by just adding a sleeve. I get it. You want to have different interchangeable options and give your customers variety. The idea of adding sleeves to a sleeveless garment seems like an easy addition. Just pop on a sleeve! However, this may sound like a quick fit, but in reality it isn’t the best plan, especially if you are fit focused.

I’m going to fill you in on all the details below. But before we dive in let me set the scene: I’m going to be addressing the challenges using the shape of a woman’s traditional tank top and traditional sleeved bodice for the talking points. The caveat is that that styling may change the advice I give below, but it generally holds true, I’d say, 80% of the time.
Design Intent
When I was a first year fashion student I was just in awe that I could make something. Never mind that it fit horribly or the construction was awful. I was just enamored by the fact that I actually made something I could wear. It wasn’t until I started working in the industry for actual designers who had a specific vision, that I realized that I had to push myself harder and see things differently to achieve the desired look.
I think if you are new to pattern making and design it’s to get caught up in the act of making a pattern and being satisfied with the work that you achieved and being ok with it. It probably took awhile to make this initial pattern, so you just want to exist here for a little while and that’s fine. But there comes a turning point where you start to see that small changes can change the look of a garment dramatically.
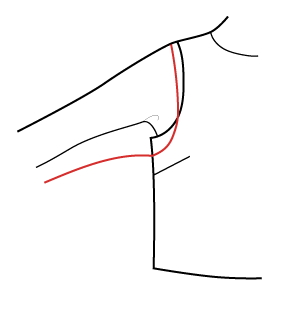
In the case of sleeveless garments, the common look is to have a shoulder strap that is a little more cut in than your traditional armhole. The result is also an armhole that is more cut in above the bust as well. For a sleeved bodice to fit well, you need a wider shoulder and armhole, so just taking a sleeve off and calling it sleeveless may not be the look you are really going for. I challenge you to really look at the garment and decide if this is what you really want.
Shoulder width
The temptation is often to blame the sleeve if it doesn’t fit right. I see social media sewers often butchering their poor sleeve if there are strange draglines, or twisting and then they are posting questions about what to do next because the results are not as expected. Friends, let me tell you this little known secret- well drafted sleeves are rarely the culprit and generally only require minor tweaking. Unless the bicep is too tight, I generally consider sleeves just a victim of circumstance. There are numerous bodice issues that create problems that show up in sleeves. However, the biggest factor in sleeve fit is shoulder width.
If the shoulder is too narrow then the cap is stretched over top of the shoulder point. This is not a good look. Now it may seem that the obvious solution is to just add more cap height until it fits well. Not only is your sleeve cap in a strange place, but the higher the sleeve cap, the less range of motion you will achieve. If you’ve ever had a hard time lifting your arms in a garment, this is one of the reasons why.
Now when I say shoulder width, I’m not referring to the length of the shoulder seam. Nope. In fact, I would like to ban this as a point of measure. It really tells me nothing about the fit of the garment and it is 100% dependent on the width of the neck. For instance, you can’t say that a shoulder seam needs to be 3” long, but then have a turtleneck and a boatneck have the same shoulder length. The numbers don’t work for the look of the garment. Instead, the shoulder width needs to be measured across the back of a garment/pattern point to point. This is where you will find standardization.

As a pattern maker, this measurement tells me a lot. It’s a measurement that I have been working with for a very long time, so I have a good idea of what it should be for the size in question. There isn’t a definitive number for each size, as it is design specific, but most brands that I have worked with standardize this number. For example, a retailer that I worked for doing woven blouses standardized that all shoulder widths should be approximately 15 ½” for dressy styles, and 16” for button-down blouses for their size 8/ medium. Your standard is totally up to you, but it’s something I encourage you to add to your practice.
Across chest and across back
Let me introduce you to a couple of very powerful points of measurement that are often overlooked. They are usually referred to as across chest and across back. Both of these points of measure are located approximately 5” down from the high point of the shoulder and measured across horizontally. These tell me if this area is too wide or too narrow for sleeved garments. In the case of sleeveless garments, it helps communicate how much additional coverage should be added or taken away.
For the across back, a sleeved garment will require extra width in this area. It should not exceed the shoulder width, but be a touch smaller. Perhaps about ½” smaller. As a side story, I’ve noticed that even in my twenty years as a pattern maker, this measurement has been increasing more and more as people are hunching over desks, computers and phones more than ever. If you try on vintage garments, this may be an area where you notice tightness because postures are changing. This extra width is definitely needed for range of movement.

The across front is a little tricky. I find that for sleeved garments getting the width of this area is the key to achieving a good range of movement. If it’s too wide the garment looks oversized. If it’s too narrow then it could be really hard to move your arms. For sleeveless garments, you may want this area wider for more coverage. If it’s too narrow then it sometimes shows too much armpit skin which not everyone feels comfortable with. A good rule of thumb is that this point of measure should be about 1 ½” smaller than the shoulder width as a starting point.

Armhole levels
Sleeved garments require that the bicep be a specific measurement for a proper fit. The bicep affects just how much/little sleeve cap length there will be. In turn this sleeve cap must sew to a specific armhole circumference. It’s always a challenge to try to match certain armhole requirements to coordinate with a bicep, as anyone who has been given a spec sheet can attest to.
The easiest way to adjust the armhole circumference is to lower or raise the underarm area/side seam, to achieve the desired circumference. This means that In a sleeved garment the armhole level could be dropped to fit a decent size sleeve cap. If you were to use this same pattern and just make it sleeveless you will find that the armhole is just too low or saggy at the underarms. In the case of women's garments, you will see that usually the bra is visible because the underarm is too low.
Since a sleeveless garment does not have to worry about fitting a specific sleeve cap into the armhole it can be as high or as low as needed.
Chest circumference
Similar to the underarm being higher, often the chest of sleeveless garments, measured 1” below the armhole level, need to be smaller. I’m not talking a lot, but as a rule, sleeveless garments tend to be slightly smaller in chest circumference than their sleeved counterparts.
Sleeves require extra mobility and to achieve this, often the chest circumference helps out. If the armhole circumference needs to be bigger and the armhole is already feeling too low, the only option is to increase the chest. Once again, the sleeve was dictating what the body needed so it’s all a balance.
But if you were to take this same pattern and remove the sleeve you would find that not only is the armhole too low the chest is a little droopy/floppy at the underarms and you feel like you want to pinch out the extra.
In the reverse, if you were to take a sleeveless garment and put sleeves on it you will probably find it restricting, tight and hard to move in.
Are you convinced?
There will of course be exceptions to what I’ve laid out. I mean, if you can achieve the look you want and be successful for both the sleeved and sleeveless version, then go for it! Knits can be especially forgiving. I wanted to share this with you because this always seems to prove true and I want you to be able to be set up for the most successful fit possible.