
What Grading Up to Plus Sizes Looks Like

In best practice you can’t just take a size small pattern and grade it into a plus size. But it seems like it should though, right?
Grading is formulaic and it presumes that the body gets bigger in a predicable ways and so specific, proven and time-tested formulas are applied. However, human bodies are unique and shapes are not as predictable as we would like. I would like to say that grading ensures a perfect fit, but really it’s an average that is trying it’s best.
When it comes to grading larger sizes (plus sizes) the “average” tends to dissipate with the addition of more and more sizes. I like to say there is a certain breaking point. This breaking point doesn’t follow hard or fast rules, but rather sublties and shifts in the pattern that don’t really represent a plus sized customer.
The situation probably sounds complex, so let me walk you through it.
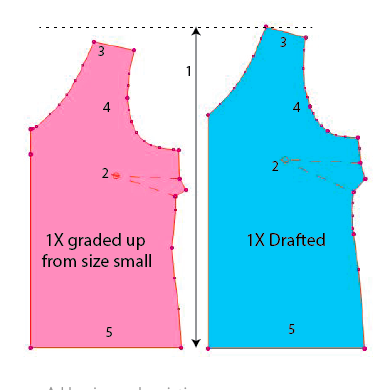
Below I have two patterns. Pattern A is a size small graded up to a size 1X. Pattern B is a 1X that I have drafted specifically for plus sizes with my own tried and true techniques.

You probably already see some differences. Let’s go over the major points (detailed in below image).
1) The body length is longer for the drafted plus size. This is because a plus size chest is bigger, so you need more length in the pattern to help for additional coverage over the bust.
2) The dart is different. Not only is it deeper, but it is longer. The deeper the dart, the more shaping is provided for larger cup sizes.
3) The shoulder is narrower for the plus size. Just because bodies are wider, does not mean the shoulders need get so much bigger. This is one of the biggest complaints with plus sizes.
4) The armhole curves are different. The graded 1X is more scooped out whereas the drafted 1X allows for more coverage at the armhole. This is particularly important for sleeveless blouses.
5) A subtle difference is the hips. The drafted 1X hip is bigger. The plus size customer has different curves to take into consideration and quite frequently have larger hips so I factor this in.
Here is what the two different methods look once they are stacked on top of each other.

Can’t you just create a plus sized grade rule?
For a relatively simple style, like the one I used to demonstrate I could potentially create a specific grade rule for making the size small grade up to a 1X successfully. The thing is, it would take quite a bit of engineering on my part and would take some trials to figure out if this is an accurate representation of your plus sizes.
Every brand that I work with on plus sizes has different fit objectives. This means creating different grade rules for every client. It’s a process that requires a deep dive with collaboration. In reality and most designers just want to have a graded pattern yesterday.
Also, this type of grade rule development work would mean sampling every single plus size, testing the fit on models and reviewing point by point what works and what doesn’t. The investment could add up.
How I make plus sizes for my clientele
When I am asked to make a plus size based on a misses style I will grade up to the body widths I need. Then I go back in and modify the shapes and measurements to work for the desired plus size customer. It’s 1000 times faster for me to make a pattern then to develop specific grade rules. This isn’t me just being anti-numbers, charts and all-analytical. Nope, my process is exactly what all large retailers and brands do as well.
Style specific details for plus sizes
One of the benefits of having a separate pattern for misses and plus sizes is the ability to treat each range for it’s own unique intentions. Many brands will deviate in styling based on their customer needs. For instance, let’s say a size small has a tiny cap sleeve that ends at the widest part of the bicep. This may not be considered flattering for a plus size that has a wider upper arm. A designer may decided to make it an elbow sleeve or just a touch longer- basically whatever their customer base requires from feedback they have received. It’s still considered the same style, made with the same fabric, but different considerations for different sizes.
Viewpoints on how to modify plus sizes can vary considerably and are 100% a design decision. For instance, I horrified one designer by suggesting that a paper bag waist pant with a giant ruffle that goes around the waist, may need to be toned down for the larger sizes (heck, even for the size 2 it looked comical). It was decidedly un-PC of me to suggest a difference. I’m totally on board with body acceptance- But in my defense, I just don’t think anyone wants to look like they are 4 sizes bigger in the midsection.
My point is this- The goal is not to dumb it down or try to fit everything into a formulaic box. It’s up to you as a designer to recognize your customers needs and how they want to feel. To do so starts with seeing and listening to your larger size customers as well.
Plus size options for every budget
Now I’ve spent the better part of this post singing the praises of having two patterns. However, I recognize that it’s not always the best solution for all products and brands. Sometimes you can get by with grading from a size XXS -6X if your styles are not fit specific. You can also just get by with grading if you want to dip your toes into the water of inclusivity. I’m also open to just giving the grading a try and seeing where we land on the plus size fit and modifying accordingly. As a grader and pattern maker, I’m flexible to try anything you are game for.
Every brand has their own unique approach, so it’s all about what will work best for your workflow and customers.